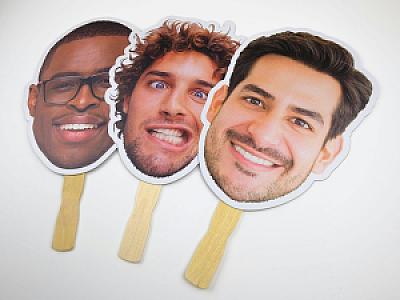
The Best Photo to Use for a Face Cutout (Tips for Perfect Results)
The quality of your face cutout comes down to one thing: the photo you send us. A sharp, well-lit image produces a cutout that looks vivid and lifelike. A blurry or dark photo produces a cutout that looks, well, blurry and dark.
The good news is you don't need a professional camera or any editing skills. A regular smartphone photo works perfectly as long as you follow a few guidelines. Here's what to aim for and what to avoid.
What Makes a Great Photo
Sharp focus. This is the most important factor. The face should be in clear focus with no motion blur. If you're taking a new photo specifically for the cutout, tap the face on your phone screen to lock focus there before you snap the shot.
Front-facing angle. We need to see the full face, looking roughly toward the camera. A slight angle is fine, but avoid strong side profiles or photos where the person is looking away. The cutout follows the outline of the head, so a front-facing shot gives the most natural and recognizable result.
Even lighting. Natural light is your best friend. If you're indoors, face the person toward a window. If you're outdoors, open shade (not direct sunlight) gives the most even results. Avoid overhead lighting that creates harsh shadows under the eyes and nose, and avoid standing directly behind a bright light source, which turns the face into a dark silhouette.
The entire head is visible. The full head (including hair, ears, and chin) needs to be in the frame. If the photo crops off the top of the head or the sides of the hair, the cutout won't look right. Leave a little space around the head in the photo. We handle all the cropping and background removal on our end.
Decent resolution. The image should be large enough that you can zoom in on the face and it still looks clear. As a general rule, if the photo looks sharp on your phone screen when you pinch to zoom in on the face, it's good enough. Most modern smartphone cameras produce more than enough resolution.
Common Mistakes to Avoid
Blurry or out-of-focus photos. This is the number one issue we see. If the image is slightly soft on your phone screen, it will look noticeably blurry when printed at a larger size. When in doubt, take another shot.
Low-resolution images from text messages or social media. This is a big one. When you send a photo through iMessage, WhatsApp, Facebook Messenger, or any social media platform, the app compresses the image and throws away detail. A photo that started at 12 megapixels might arrive at 1 megapixel or less after being texted. Always share the original file using AirDrop, Google Photos link, Google Drive, or email attachment. (See our full guide to sharing high-quality photos.)
Screenshots of photos. Taking a screenshot of a photo captures it at your screen's resolution, not the original photo's resolution. The result is a much smaller, lower-quality file. Always send the actual photo file, not a screenshot of it.
Group photos that require heavy cropping. If the person's face takes up only a small portion of the image (like a wide group shot), zooming in and cropping to just their face leaves very few pixels to work with. The printed cutout will look soft or pixelated. If the only photo you have is a group shot, pick one where the person is relatively close to the camera.
Photos with obstructions. Sunglasses, hands near the face, other people partially overlapping, or objects blocking part of the head all make it harder to produce a clean cutout. A clear, unobstructed view of the face and head gives the best result.
Extreme filters or heavy editing. If the photo has a strong Instagram filter, extreme color grading, or has been heavily smoothed or altered, the cutout may look unnatural when printed. The more natural the photo looks, the better the cutout will look.
How to Take a New Photo Specifically for a Cutout
If you have the chance to take a fresh photo (rather than using an existing one), here's how to get the best result in about 30 seconds.
- Find good light. Go near a window indoors, or step into open shade outdoors. Avoid direct sunlight and overhead fluorescent lighting.
- Position the person. Have them face the camera straight on. They can smile, make a funny face, or keep a straight expression. Whatever matches the mood of the event.
- Frame the shot. Include the full head and a little bit of the shoulders. You don't need to crop tightly. Leave some space around the head and we'll handle the rest.
- Tap to focus. On your phone, tap the face on screen to make sure the camera focuses there.
- Hold steady and shoot. Hold the phone as still as possible. If the person tends to blink, take 3-4 shots quickly and pick the best one.
- Check the result. Pinch to zoom in on the face. If it looks sharp and well-lit, you're good. If it's blurry, try again.
That's it. The whole process takes less than a minute and gives you a photo that will produce an excellent cutout.
Using Existing Photos
You don't always have the luxury of taking a fresh photo. Maybe you're making a cutout as a surprise, or you're using a childhood photo for a milestone birthday or graduation party. Here's how to work with what you have.
Photos from your camera roll: These are usually fine as long as they're in focus and well-lit. Just make sure you upload the original file from your phone rather than sending it through a messaging app first.
Photos from someone else's phone: Ask them to share the original file via AirDrop, Google Photos link, or email. Do not have them text it to you. The compression from texting will noticeably reduce the quality.
Printed photos (old prints, yearbook photos, etc.): If the photo only exists as a physical print, scanning it on a flatbed scanner at 300 DPI or higher will give the best result. If you don't have access to a scanner, you can photograph the print with your phone. Lay the print flat on a table, make sure there's no glare from overhead lights, and hold your phone directly above it (not at an angle). Get as close as possible while keeping the image sharp.
Photos from social media: Downloading a photo from Instagram, Facebook, or any social platform will give you a compressed, lower-quality file. This is usually not ideal for printing. If the photo was originally yours, find the original in your camera roll instead. If it belongs to someone else, ask them to send you the original file directly.
What Happens After You Upload
Once you upload your photo, we review it and handle all the production work:
- Background removal. We cleanly remove whatever is behind the person so only the face and head remain.
- Cropping and sizing. We scale the image to fit the cutout size you selected, making sure the proportions look natural.
- Color and sharpness adjustments. Minor corrections to make sure the print looks its best.
- Precision cutting. The cutout is laser cut to follow the exact outline of the head and hair.
If we receive a photo that we think won't produce a good result (too blurry, too small, or too dark), we'll reach out and let you know before printing. We'd rather help you find a better option than deliver a cutout you're not happy with.
Ready to Order?
Head to our Big Face on a Stick page, choose your size and quantity, and upload your photo. If you're unsure whether a specific photo will work, send it to us and we'll give you honest feedback before you place your order.